"Let's have a merry journey, and shout about how light is good and dark is not. What we should do is not future ourselves so much. We should now ourselves. "NOW thyself" is more important than "Know thyself." Reason is what tells us to ignore the present and live in the future. So all we do is make plans. We think that somewhere there are going to be green pastures. It's crazy. Heaven is nothing but a grand, monumental instance of future. Listen, now is good. Now is wonderful." ~ Mel Brooks

Showing posts with label For Little Hands. Show all posts

Friday, April 19, 2013

For Little Hands ~ Frogs


Welcome to For Little Hands, a weekly series that hopes to inspire creative whimsy for the little hands in your life.
 
We had a fun spring craft project planned for today but we were joyfully distracted by this unplanned frog date. I'm choosing to post this instead of the craft project because I'm finding it all too necessary to be focusing on the whimsy of life, the unplanned joyous moments with my children. There is so much to be sad and scared about in the big world outside our window.....pulling in and really seeing the beauty, the peace, and hearing the belly laughs is way more important (today) than sitting down to a structured something or other. Today, we needed to just be in our moments. No directions. No plans. We needed to just be lead by the wind and our childhood daydreams.
 
 
Today we met some frog friends. We visited Daddy at work today and there is a great little frog pond that was bustling with activity. One peek lead to immediate giggles and wet feet. Can you make out our little friend in the center of the picture above?


We were all on our hands and knees being eluded by these slippery little frogs. Some, actually, weren't so little!


Sometimes we actually caught one!


When we did it was shear joy! To feel their slippery, wet, smooth skin. How quickly they jumped and slithered through our hands. Oh, how happy they made us all!


It's hard to explain the excitement about catching frogs. It's a simple activity, perfect for any size hands, young and old. It's all about timing and being gentle.


Kiki would have carried one around in her pocket all day if she could!


This photo made me so happy. My adoring husband, my three littles, and our dear Victor (my husband's work partner) all down and seeking a frog in hopes of holding one for just a moment.
I even caught one!
 
Whatever it is you'll do today with the little hands in your life, I hope you'll take the time to breathe in and soak up those precious, undirected moments. Turn away from the darkness in the world for just a while and embrace the light that brightens your life. Our children are the carriers of the brightest light. Give them the space to shine and allow yourself the space to let them remind  you how to shine.
 
Loving wishes to you all for a peaceful weekend xo

Friday, April 12, 2013

For Little Hands :: Homemade Seedling Pots

 
Welcome to For Little Hands, a weekly series that hopes to inspire creative whimsy for the little hands in your life.


Spring is eluding us today. It is a mere 38* outside and there is this wintry mix of rain/sleet/snow happening periodically. This photo was taken this morning.....I was a bit shocked! I know April is capable of many things, I've just been in denial that we would actually continue to see the "white stuff" again. Oh well. We've got the wood stove cranked and it's a balmy 76* inside, I'm devouring a box of Hot Tamales,and while we've got the dream of Spring and warmth on our minds we set off to make some seedling starter pots that we will transfer into the littles gardens outside when the time comes.
 
If you'd like to join us, this is what you'll need::
 
Newspaper cut into 3-4 inch wide strips (the length of the newspaper)
A bottle (a notch in the bottom is helpful by not necessary)
Good potting soil
A tray for the pots to sit upon
seeds
something to label your pots
A sunny window
 
I find that this type of activity is perfect for a cooped up inside day. Hands get dirty and there is an element of care and excitement built into the activity. Planting seeds and children go hand in hand. I couldn't imagine planting a garden without a child or two in the mix.


Set the bottle on about 2/3 of the newspaper strip, long ways. You should have about an inch or so that goes passed the end of the bottle.


Roll the paper strip around the bottle, tightly.


Fold the end of the strip into the notch of the bottle, sort of like wrapping a present. It won't stay put entirely but when you put the soil in it will balance out.


Next, fill your pots with soil.


And then the seeds! YAY!!!


Once all of your seeds are planted give them a good drink of water and set them in a sunny window. Covering them with plastic wrap will form a greenhouse effect and sprouting may begin sooner.


The best part about these pots is they can be sewn directly into the soil and will amend the soil as brown matter. It's a win/win.

 
I hope where ever you are today, dear friend, you are warm and embracing Spring (or Autumn, for my Southern Hemisphere friends xo)

Friday, March 29, 2013

For Little Hands:: Vacationing

Welcome to For Little Hands, a weekly series that hopes to inspire creative whimsy for the little hands in your life.
 
I don't have any crafting ideas for you this week because we are busy crafting a holiday to DC. I'll just share some photos with you on how we've begun to do that :)


Snuggles are imperative to beginning a vacation
 
 
Rainbows have been finding us lately.....hope in form.
 
 
Late night shaking the sillies out


Goofing and smiles!

Sleepiness and more snuggles is vacation


Joy!


I hope this finds all of you well and enjoying your holiday weekend! xoxo

Friday, March 22, 2013

For Little Hands:: Pysanky

Welcome to For Little Hands, a weekly series that hopes to inspire creative whimsy for the little hands in your life.


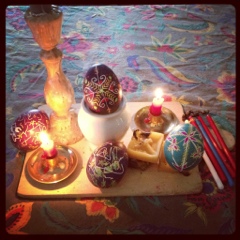
Easter is just around the corner and we've been working feverishly to create some beautiful Pysanky eggs for our Easter tree. We are planning to get away over the holiday, but traditions run deep in our family. Regardless of where we'll be celebrating, our home will continue to hold the preparations we've set; the essence of our honor to the Lenten season and the newness and comfort in knowing that with love and forgiveness all things are possible.


Pysanky is a beautiful and meditative way to decorate eggs for Easter. It requires patience and a gentle hand. I have found, that for the littlest hands (1-3 year olds) beeswax crayons are a safer option for the resist part, instead of the hot wax and a hot kistka. The dying can remain the same but with a bit more adult assistance. Charlotte was 4 when she used her first kistka. I sat right beside her and showed her all the hot parts of the process. I sat closely to her and did my best to help her avoid any spills of hot wax. It was the look on her face when she dyed her egg, with each dipping of color it was if magic was happening right before her eyes. And it was!


The process of Pysanky requires some specific tools::

~ Natural beeswax blocks
~ Kistkas (medium size works best for little hands)
Kistkas are the tools used to draw the melted wax onto the egg. The more modern ones have plastic handle and a brass cup with a spout. 
~ Egg dye in various colors from light to dark
(we have Mason jars filled with yellow, orange, pumpkin, pink, red, scarlet, light green, turquoise, light blue, royal blue, and purple)
~ Lit candles to heat up the kistka and melt the wax of the egg when completed
~ Eggs, blown out or not (the ones left with the yolks will eventually dry out over time)
~ Rags for soaking up the dye and wiping of the hot wax

There are many wonderful books available that will give you the run down and even step by step instructions for designs. This is not an instant gratification project. It takes much time and patience. An egg can take a whole day or more depending on how intricate the design. 

To give you an overview of how Pysanky is done::

First, draw your basic design on your egg with a pencil. Then, you heat up the kistka in the flame of a lit candle. Scoop up some beeswax into the cup of the kistka, and begin drawing the first bit of your design onto your egg. These first lines will be white when you're finished. Then you dip your egg into the first light color of your choosing. You must go from lightest colors to darkest. Each line drawn with wax after you've dyed the egg will be the last color you dipped. I hope this makes sense :) Pysanky is basically wax resist/batik style egg decorating. If you haven't tried it, you must! Find a book that inspires you, and have at it! The heirlooms that will come from the creations you make will be worth the time and energy learning this technique. 


There is a bit of a disclaimer I will attach to this. When committing to Pysanky egg dying you are agreeing to take a risk of heartbreak if an egg should break, especially after hours of work and prayer have been poured over its creation. I find that this process reminds me of the ebbs and flows of living; how I might have worked so hard at something only to have it fall apart or with great effort and care I might have been afforded the honor of seeing my passion come to form, but in the end, the lesson I come away with is that nothing is mine to keep, only to nourish and love. I can tend to, breathe life in to, and gently care and provide for this little gift but there is a path that belongs to the process, and it's not mine to control. 

You have to take risks. We only understand the miracle of life when we allow the unexpected to happen. ~ Paulo Coelho

I wish for you all a wonderful week of preparations for the Easter time upon us. I would love to see and hear all about your egg dying eggstravaganzas (I couldn't help it!!!). If you have pictures you'd like to share, post them to our Facebook page. I will add them into the Shared Inspiration album. 

Spring has sprung and Easter is near,
 Bringing about laughter and cheer.
Be merry, be light, and prepare the way,
To honor and welcome the newness of each day.


Friday, March 15, 2013

For Little Hands:: Maple Sugaring

Welcome to For Little Hands, a weekly series that hopes to inspire creative whimsy for the little hands in your life.

How each the Whole its substance gives,
each in the other works and lives!
See heavenly forces rising and descending,
their golden urns reciprocally lending:
on wings that winnow sweet blessing
from heaven through the earth they're pressing,
to fill the All with harmonies caressing.
~ Goethe


We missed last week's For Little Hands as well as all of this week due to so much busyness that has crept up kind of suddenly. We found ourselves in the midst of needing a new car. We knew we'd need one, eventually, but all at once it became quite clear we needed it sooner rather than later. Much of my time and energy went into researching, finding, and surrendering to the process. We didn't have much money to spend on a "new to us" car and being the family size that we are we were finding that affordable options were limited to a certain style vehicle. We finally found the car we could see ourselves in. It was within our price range, could hold all seven of us comfortably, needed minimal work, was a bit higher on our hoped for mileage but in the end, and after hours of research on my husband's part, we felt this particular vehicle would be our best option. Like Kiki in the photo above, we took a leap of faith and just let the process guide us, making decisions as we needed to along the way, and simply sailed through it. Anyway, it made for a very quick week!

The community Maple Syrup evaporator
 
This week also found us in the midst of Maple Syrup season. Living in an intentional community provides us many opportunities to jump in and help create our experiences. The process behind maple sugaring is such a beautifully in tune expression, children love it and get so much out of the process. If you live in an area where you could visit a farm that taps their trees and processes for maple syrup I highly recommend you try and visit. From beginning to end it's such an enlivening experience; the vitality and connection to the natural rhythm around you is palpable.
 
Seraphina has been enjoying more time outdoors as her health strengthens. Her new favorite spot is in the backpack!
 
 
One of the best parts of maple sugaring is collecting the sap. We've got about 20 or so trees tapped here so there is more than enough for each child to go around with a collection bucket and collect the sap. It's such a sweet wonder and the look of awe and excitement from the children as they open the lid to the buckets, discover the watery sap within, pour it into their bucket, and then, of course, sneak a taste of the sweet sap from their bucket. Children know the reverence and respect this process deserves. They're so joyful and fully immersed in the experience. They're gentle and loving.
 
 
The littlest hands can help by finding the sap buckets on the tree, they can help pour the sap into the catch buckets, they can help carry the sap-laden buckets, and they can help by simple smiling and loving the process; running about, laughing and playing and reaching in, over and over again, to taste the sweet sap.

 
It's an "all hands on deck" experience. Many hands make light work.


One of Kiki's favorite ways to help was by holding on to the sap collection bucket and sneaking tastes
of the sap when she thought I wasn't looking!


Full to the brim soup pot full of partially evaporated sap
 
After a few days of evaporating the sap we each went home with a soup pot full of mostly evaporated syrup to finish on our stove top. This part requires patience.....littles might have a hard time waiting especially with the long awaited gift being so close they could taste it! When I found their patience being tried, I reminded them of all the hard work that went into collecting and preparing the sap, the fun and community that was built in the experience, and then...I offered them a taste of the almost ready syrup.


Reduced by over half after 3 hours of cooking


After 3 hours of finishing we ended up with 2 full quarts of syrup and an immediate request for pancakes for breakfast the next day!
 
We went to bed with the taste of what our beautiful Sugar Maples have provided for us, the satisfaction of hard work behind us and the promise of more in the next few weeks. We all felt tied more closely to the land that surrounds us and gave thanks for the abundance.
 
In what ways do you honor the natural rhythms around you? How do you plug in and connect to the land that surrounds you?


Friday, March 1, 2013

For Little Hands:: Rainbows

A lovely rainbow, see it span,
So brightly shining o'er the land.
It is so bright, gold, green, and blue.
I'd like to climb it now with you.
 
~ Painting song from Charlotte's Waldorf kindy.
 
 
Welcome to For Little Hands, a weekly series that hopes to inspire creative whimsy for the little hands in your life.
 
We encountered the most beautiful rainbow earlier this week and it still has our heart. It's been mostly gray here this week, lots of rain and slushiness.....we thought it was a great idea to bring some rainbow energy into our handwork activity for today.  
 
 
I brought out all of our wool roving and together we pulled out all the colors of the rainbow:: red, orange, yellow, green, blue, indigo, and violet. I let Kiki just mix it up and play with it how ever she saw fit.
 
 
Then, I had her spread the wool all over a piece of felt that was the shape of a circle, about 8 inches in diameter. 
 
 
Then, we slathered it with dish soap and began to felt it very, very gently.
Here is a great link to Rosy ~ Posy on wet felting a picture scene. We didn't have any netting or mesh so ours didn't turn out exactly how we'd hoped......but, we made it work for us :)
 
 
To help keep our felted wool attached to our felt piece (because we didn't have any mesh to protect to wool, we couldn't really rub it vigorously enough to help it felt to the round felt piece) we made some shamrocks to sew to our rainbow.


Here is our finished rainbow wall hanging. You can see where the wool felted itself but not to the felt backing. It's still beautiful, though. We hung it up next to the littles kitchen space, right at eye level. Kiki stops to look at it whenever she passes by it. It's a lovely splash of color against the gray, dim light from outdoors.
 
Wishing you all days full of color and whimsy xo


Related Posts Plugin for WordPress, Blogger...